WELCOME

Showing posts with label windows. Show all posts

Saturday, March 17, 2012

အင္နက္နက္မွ တဆင့္ တျခားကြန္ပ်ဴတာကို ျပဳျပင္ျခင္း(window 7)

Thank You Visited My Blog.

က်ေနာ္ Window 7 မွာပါတဲ႔ Tools ေလးတစ္ခု အသံုးျပဳပံုေလး တင္ျပခ်င္ပါတယ္...Team viewer တို႔လို အသံုးျပဳႏိုင္တဲ႔ Tools ေလးပါ.. မိမိစက္ကေန အြန္လိုင္းမွတစ္ဆင့္ တစ္ျခားတစ္ေယာက္ရဲ႕ ကြန္ပ်ဴတာကို ၀င္ၾကည္႔တာတို႔ လိုအပ္တာေလးေတြ လုပ္ေပးလို႔ရတဲ႔ Tools ေလးပါ...WINDOW TOOLS ေလးေတြကို စိတ္၀င္စားတဲ႔ သူငယ္ခ်င္းမ်ားအတြက္ စိတ္၀င္စားဖို႔ေကာင္းမွာပါ...ေအာက္မွာလုပ္ပံု လုပ္နည္းေလးေတြ ၾကည့္လိုက္ပါဦး.....


လုပ္နည္း

အၾကည့္ခံရမည့္သူ လုပ္ေဆာင္ရမည့္အပိုင္း

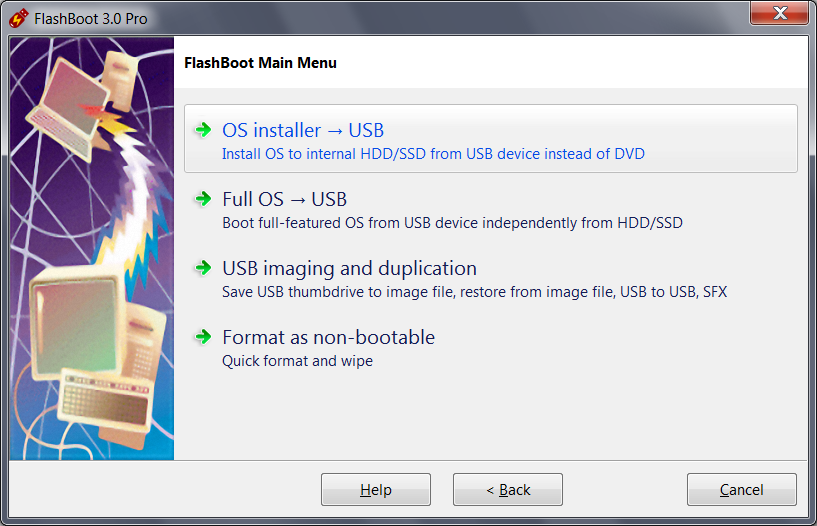
၁။ START >> WINDOW REMOTE ASSISTANCE လို႔ရိုက္လိုက္ပါ....
၂။ BOX ေလးတစ္ခု က်လာပါလိမ့္မယ္...က်လာတဲ႔ BOX ေလးထဲမွာ အနီေရာင္၀ိုင္းျပထားတဲ႔ ေကာင္ေလးကို CLICK ႏွိပ္ျပီး၀င္လိုက္ပါ..
၃။ ပံုမွာျပထားတဲ႔ အတိုင္း အနီေရာင္၀ိုင္းျပထားတဲ႔ BOX ေလးကိုႏွိပ္ျပီး ရလာတဲ႔ ဖိုင္ေလးကို DESKTOP မွာ SAVE ထားလိုက္ပါ...
 
၄။ SAVE လိုက္တာနဲ႔ PASSWORD ေပးတဲ႔ BOX ေလးပါ။ တစ္ခါတည္း က်လာမွာျဖစ္ပါတယ္...(BOX ကိုမပိတ္လိုက္ပါႏွင့္...)
၅။ ရလာသည့္ FILE နဲ႔ PSSWORD ကို ၾကည့္မည့္သူ ဆီသို႔ G-TALK မွတစ္ဆင့္ ပို႔ေပးလိုက္ပါ...

ကည့္မည့္သူအပိုင္း

၁။ ၾကည့္ခံရမည့္သူ ပို႔လာတဲ႔ ဖိုင္ကိုဖြင့္ ျပီး ေပးထားတဲ႔ PASSWORD ကို BOX ထဲမွာ ထည့္လိုက္ပါ..
၂။ အဲဒီအဆင့္ေတြ ျပီးသြား၇င္ေတာ့ ကြန္ပ်ဴတာ တစ္လံုးနဲ ့တစ္လံုး ၾကည့္လို႔... ျပဳၿပင္လို....ရသြားပါျပီ


Friday, March 16, 2012

Windows OS ျဖစ္စဥ္မ်ား

Thank You Visited My Blog.
ကၽႊန္ေတာ္သိသေလာက္ WINDOW OS ေတြရဲ့ျဖစ္စဥ္မ်ားပါ
မိမိတုိ႔ သုံးေနတဲ႔ OS ကဘာလဲ ေမးလားတဲ႔ သူမ်ားရွိလာရင္ သိႏုိင္ေအာင္
ပါ

Microsoft ကထုတ္တဲ႔ OS အမ်ဳိးအစားမ်ား.....

-1983 November Microsoft Windows

-1985 November Microsoft Windows 1.0

-1987 December Microsoft Windows 2.0
-1987 December Microsoft Window/386
-1988 June Microsoft Window/286
-1990 May Microsoft Windows 3.0
-1991 October Microsoft Windows 3.0a
-1992 April Microsoft Windows 3.1
-1993 October Microsoft Windows for Workgroups 3.1
-1993 August Microsoft Windows NT 3.1
-1993 April Microsoft Windows
-1994 February Microsoft Windows For Workgroups 3.11
-1994 September Microsoft Windows NT 3.5
-1995 June Microsoft Windows NT 3.51
-1995 August Microsoft Windows 95
-1996 August Microsoft Windows NT 4.0
-1996 November Microsoft Windows CE 1.0
-1997 November Microsoft Windows CE 2.0
-1998 June Microsoft Windows 98
-1998 July Microsoft Windows CE 2.1
-1999 May Microsoft Windows 98 SE(Second Edition)
-1999 Microsoft Windows CE 3.0
-2000 February Microsoft Windows 2000
-2001 October Microsoft Windows XP Home Edition & Professional
-2002 September Microsoft Windows XP SP1
-2003 February Microsoft Windows XP SP1a
-2003 March Microsoft Windows Server 2003
-2004 August Microsoft Windows XP SP2
-2006 Nvo, 2007 Jan Microsoft Windows Longhorn


Microsoft Windows Longhorn ဆုိတာ Window Vista ကုိေျပာတာပါ...
Window Vista သည္ Software ရဲ႕ အမည္ျဖစ္ပါတယ္
...Longhorn က code name ျဖစ္ပါတယ္

Window XP ေပၚခါစက codename က Whistler ျဖစ္ျပီး
Windows XP Service Pack 2 ရဲ႕ codename က Trainyard နဲ႔ Windows XP
Service Pack 2
ရဲ႕ codename ကေတာ႔ Springboard ျဖစ္ပါတယ္...အခုေတာ႔ Window 7
လဲထြက္လုိ႔ သုံးတဲ႔ မိတ္ေဆြမ်ားလည္းမ်ားလဲ ၾကဳိက္တဲ႔ သူကၾကဳိက္ မၾကဳိက္တဲ႔ သူက မၾကဳိက္ေပါ႔ဗ်ာ...က်ေနာ္ကေတာ႔ XP SP2 ေလးပဲ ၾကဳိက္ပါတယ္ဗ်ာ...
Window System မတုိင္မွီကေတာ႔ DOS(Disk Operating System) ကုိသုံးၾကပါတယ္...
၁၉၈၁ ခုႏွစ္က စျပီးေတာ႔ MS-DOS 1.0 နဲ႔ ကြန္ပ်ဴတာေဆာ႔ဖ္၀ဲ ကမာၻၾကီးထဲကုိ
၀င္ေရာက္ခဲ႔တဲ႔ Microsoft Company ဟာ အၾကီးအက်ယ္ေအာင္ျမင္ခဲ႔ပါတယ္....
၁၉၉၄ ခုႏွစ္မ်ားအထိ MS-DOS system မ်ားကုိ ထုပ္လုပ္ေနခဲ႔ျပီး Window System
သုိ႔ ကူးေျပာင္းလာခဲ႔ျခင္း ျဖစ္ပါတယ္...က်ေနာ္ ေျပာလုိက္တာ ပုိတာ လုိတာေလးေတြ ရွိသြားရင္ ေတာ့ေဆားရီးပါဗ်ာ..မသိေသးေသာသူမ်ားကုိ သိေစခ်င္လုိ႔ပါ...

Wednesday, January 11, 2012

ၿပဴတင္းေပါက္ေတြၿပဳၿပင္တဲ့နည္းေတြေလ

Thank You Visited My Blog.

ၿပဴတင္းေပါက္ေတြၿပင္တဲ့နည္းေတြေလ..
စာအုပ္ေလးေတြေဒါင္းၿပီးဖတ္ေနာ္..
အၾကိဳးရွိပါတယ္ဗ်ာ..
 Download Link :

Window XP Repair
Window XP Installation
Window 7 Repair
Window 7 Installation

Thursday, November 10, 2011

Windows 7 Repair Disc ျဖင့္ Windows ျပန္မတက္တဲ့ ျပႆနာမ်ားကိုရွင္းမယ္

Hello! Thank You Visited My Blog
   

ဒီေကာင္ေလးက ၀င္းဒိုး Boot ျပန္မတက္တာ Screen ျပာတက္ေနတာ ၀င္းဒိုး Restart ခဏခဏက်တာေတြအ
တြက္ျပန္လည္ေကာင္းမြန္ေအာင္ စြမ္းေဆာင္ေပးနိုင္တယ္လို ့ဆိုပါတယ္။ကၽြန္ေတာ္ျဖစ္တဲ့ျပႆနာေလးကို ေျပာ
ျပခ်င္ပါတယ္။
     ကၽြန္ေတာ္လက္ေတာ့တစ္လံုးကို အျခားနိုင္ငံတစ္ခုကေနမွာလိုက္ပါတယ္။Dell Inspiron 2nd generation
Intel Core i7 အမ်ိဳးအစားပါ။Genuine Win7 Home Premium 64 Bit Service Pack 1 ႏွင့္ပါ။ေရာက္လာေတာ့
Partation တစ္ခုတည္းျဖစ္ေနလို ့ ထံုးစံအတိုင္း MyComputer > Manage ကေန၀င္ျပီးေတာ့ Partation ေတြ
ခြဲပါတယ္။အရင္လည္းလုပ္ေနက်ပါ။ျပီး Restart ခ်လိုက္တဲ့အခါမွာေတာ့ Windows ျပန္တက္မလာေတာ့ဘဲနဲ ့
BOOTMGR  is missing စာေၾကာင္းရယ္ Press  Ctrl+Alt+Del to restart ဆိုတဲ့စာေၾကာင္းနဲ ့ Screen မဲမဲ
ၾကီးကေပၚလာပါတယ္။သူေျပာသလို Restart လုပ္တာလည္းမရပါဘူး။ေတာ္ေတာ္စိတ္ညစ္သြားတာပါ။ကိုယ့္မွာ
ရွိတဲ ့၀င္းဒိုးနဲ ့ျပန္တင္ရင္ ရေပမဲ ့သူ ့စက္ထဲမွာထည့္ေပးလိုက္တဲ့ Software ေလးေတြကို သေဘာက်ေနလို ့၀င္း
ဒိုးအသစ္လည္းျပန္မတင္ခ်င္တာနဲ ့ အျခားစက္တစ္လံုးနဲ ့ဂူဂဲလ္ထဲမွာရိုက္ရွာျပီး အလားတူျပႆနာမ်ိဳးေတြေျဖ
ရွင္းထားတဲ့ ဗီဒီယိုဖိုင္ေတြကို Youtube မွာၾကည့္ေတာ့ဒီ Windows 7 Repair Disc ဆိုတာေလးနဲ ့ေျဖရွင္းတာ
ကိုေတြ ့တာနဲ ့ ဂူဂဲလ္မွာဘဲရွာေဖြေဒါင္းယူကာ CD အျဖစ္ ရရွိလာတဲ့ ISO ဖိုင္ေလးကို Burn ယူလိုက္ပါတယ္။
ျပီးေတာ့ ျပႆနာျဖစ္ေနတဲ့စက္ကို FirstBoot မွာ CD/DVD ေျပာင္းလည္းေပးျပီး Repair ခ်ပ္ကိုစက္ထဲထည့္
ကာ Restart ခ်လိုက္ပါတယ္။ျပန္တက္အလာမွာ“Press any key to boot from CD or DVD”- ဆိုေတာ့ ကီး
တစ္ခုခုႏွိပ္ေပးလိုက္ပါတယ္ ၀င္းဒိုတင္သလိုပါဘဲ Language ေတြဘာေတြေရြးေပးျပီး Repair your Computer
ကိုေရြးေပးကာ Next နဲ ့သြားပါတယ္။ေနာက္တစ္ခါ System Recovery Option မွာလည္း Next ဘဲဆက္ေပး
လိုက္ပါတယ္။သူ ့လုပ္ငန္းစဥ္မ်ားျပီးသြားတာႏွင့္ Finish ေပးလိုက္ယံုပါဘဲ။Windows ကအရင္အေကာင္းအတိုင္း
ျပန္တက္လာပါေတာ့တယ္။

     ကဲကၽြန္ေတာ္လိုျပႆနာၾကံဳသူမ်ား မသိရွိေသးသူမ်ား ေဆာင္ထားလိုသူမ်ားအတြက္ ဒီေကာင္ေလးကိုျပန္
လည္ေ၀ငွလိုက္တာပါ။32 Bit အတြက္ေကာ 64 Bit အတြက္ေကာတင္ေပးထားပါတယ္။အားလံုးအဆင္ေျပနိုင္
ၾကပါေစ။Windows 7 အမ်ိဳးအစားအားလံုးကို Repair လုပ္ေပးနိုင္ပါတယ္။150 MB သာသာပမာဏရွိပါတယ္။
(၁)  Win7 64 Bit Repair Disc
(၂)  Win7 32 Bit Repair Disc

5 seconds အတြင္းWindows Genuine လုပ္ရေအာင္

Make Your Windows Genuine in 5 seconds !
Make Your Windows Genuine in 5 seconds ! | 2 MB
Windows genuine is genuine your windows os in 5 seconds..if u have problem with windows you can try this..

Install

Step 1: Run the Tool "ROCKXP4.exe"

Step 2: Click I agree to start the program

Step 3: Click on Windows key TAB

Step 4: Click on Scan to get your Product key

Step 5: In the bottom of the program screen eneter the key given below and click modify.

Step 6: It is all finished you have a valid copy...

Download:
http://www.filesonic.com/file/2405260624/M.W.G.5.s.rar

Friday, November 4, 2011

window 7 genuine ျပဳလုပ္နည္း

ဒီေန့ က်ေနာ္ေဆြးေႏြးမယ့္ အေၾကာင္းအရာ ကေတာ့ window7 အမ်ဳိးမ်ိဳး , window vista အမ်ဳိးမ်ိဳး,window server 2008 အမ်ဳိးမ်ိဳး အ သံုးျပဳေနတဲ့မိတ္ေဆြမ်ား genuine window မျဖစ္ေတာ့ window activate မျဖစ္ ေတာ့လို ့စိတ္ညစ္ေနတဲ့ မိတ္ေဆြမ်ား genuine window ျဖစ္ေအာင္ေအာက္မွာ window7 loader ကိုအသံုးျပဳျပီး ျပဳလုပ္ပံု အဆင့္ဆင့္ ကို ပံုေလးေတြနွင့္တကြ ေဖၚျပေပးမွာျဖစ္ပါတယ္။ window activate ျပဳျပင္ေပးနိုင္တဲ့ tool ( ၃ ) မ်ိဳးကို ေအာက္မွာေဖၚျပေပးပါမယ္။

1. Se7en Activator V3
2. Windows Loader
3. Windows 7 Loader Slic Activation with OEM information

အေပၚပံုေလးကေတာ့ Se7en Activator V3 ရဲ ့ပံုျဖစ္ပါတယ္။ download ကို ေအာက္မွာယူလိုက္ပါ။


window loader
အေပၚကပံုေလးကေတာ့ Windows Loader ရဲ ့ ပံုေလးျဖစ္ပါတယ္။ download ကို ေအာက္မွာယူလိုက္ပါ။


Windows 7 Loader Slic Activation with OEM information
အေပၚကပံုေလးကေတာ့ Windows 7 Loader Slic Activation with OEM information ၇ဲ ့ပံုေလးျဖစ္ ပါ တယ္။ download ကိုေအာက္မွာယူလိုက္ပါ။


window loader ကိုအသံုးျပဳ နည္း

step: 1 : install button ေလးကို click လိုက္ပါ။
step: 2 : notice box တစ္ခုေပၚလာရင္ OK ေပးလိုက္ပါ။


step: 3 : အေပၚက Notice box ကို ok ေပးျပီး 60 seconds ေလာက္ မိမိစက္ အတြင္း installation ကို ျပီး ေအာင္လုပ္ေပးေနပါလိမ့္မယ္။ ျပီးရင္ computer ကို restart လုပ္ဖို ့ installation complete box ေပၚလာရင္ Restart ကို click လိုက္။


step: 4 : အခုဆိုရင္ ေတာ့ မိမိရဲ ့ကြန္ပ်ဴျပန္တက္လာတဲ့ အခ်ိန္မွာ မိမိတို ့ရဲ ့window ၾကီးက genuine window ျဖစ္သြားတာကို ေအာက္က ပံုေလးအတိုင္းေတြ ့ျမင္ၾကရပါလိမ့္မယ္။
step: 5 : ျပီးပါျပီ .

Supported operating systems:
Windows 7 Ultimate Windows 7 Ultimate E Windows 7 Professional Windows 7 Professional E Windows 7 Home Premium Windows 7 Home Premium E Windows 7 Home Basic Windows 7 Starter Windows 7 Starter E Windows Vista Ultimate Windows Vista Business Windows Vista Business N Windows Vista Home Premium Windows Vista Home Basic Windows Vista Home Basic N Windows Vista Starter Windows Server 2008 R2: Enterprise Windows Server 2008 R2: Standard Windows Server 2008 R2: Foundation Windows Server 2008: Enterprise Windows Server 2008: Standard Windows Server 2008: Foundation Windows Small Business Server 2008
မိတ္ေဆြသူငယ္ခ်င္းမ်ား အားလံုး အဆင္ေျပၾကပါေစ...

ေက်းဇူးတင္ပါတယ္...

Windows 7 Ultimate SP1 (32 Bit & 64 Bit) ISO ႏွင့္ အျခား Windows ISO ဖိုင္မ်ား

 window os အားလံုးအလိုရွိေနသူမ်ား    ရယူနိုင္ရန္
အတြက္ရည္ရြယ္ျပီး ဒီပို ့စ္ကိုတင္ေပးလိုက္တာပါ ဖိုင္ေတြခြဲမထားပါဘူး အားလံုးအသင့္ ကူးယူနိုင္တဲ့ ISO
ဖိုင္မ်ားျဖစ္ပါတယ္။ကြန္နက္ရွင္ေကာင္းလို ့ကေတာ့ အမုန္းသာဆြဲေတာ့ဗ်ာ။ကြန္နက္ရွင္မေကာင္းဘူးဆိုရင္
ေတာ့ ကၽြန္ေတာ္တို ့ဇာတ္လိုက္ေက်ာ္ Downloader ၾကီး IDM ႏွင့္သာ နားနားျပီးဆြဲ ယူလိုက္ၾကပါ။
     ခုကၽြန္ေတာ္ခ်ိတ္ေပးထားတဲ့ Download Crewဆိုတဲ့ဆိုဒ္က အျခား Software ေတြလည္းစံုမွစံုဘဲဗ်ာ။

(၁)   Windows 7 Ultimate SP1 (32 Bit)
(၂)   Windows 7 Ultimate SP1 (64 Bit)
(၃)  Windows 7 Professional SP1 (32 Bit)
(၄)  Windows 7 Professional SP1 (64 Bit)
(၅)  Windows 7 Home Premium SP1 (32 Bit)
(၆)   Windows 7 Home Premium SP1 (64 Bit)

(၇)  Windows 8 Developer Preview (32 Bit)
(၈)   Windows 8 Developer Preview (64 BiT)
                              ေပၚလာေသာစာမ်က္ႏွာ၌အထက္ပါလိုဂိုေလးေပၚကလစ္၍ေဒါင္းယူပါ

(၉)   Windows 7 Genuine Software (ဂရမ္ဒီလုပ္တဲ့ ေကာင္ေလးပါ ၀င္းဒိုးတင္ျပီးတာႏွင့္ ဒီေကာင္ေလး
ကို ဒဘယ္ကလစ္ေလးေပးျပီးApply လုပ္လိုက္ယံုပါဘဲ သူ ့အလိုလိုစက္က Restart ခ်ျပီးျပန္တက္လာရင္ Windows ဟာGenuine ျဖစ္သြားပါျပီ)

(၁၀) Xillsoft ISO Bunner + Keygen (ဒါကေတာ့ေဒါင္းလို ့ရလာတဲ့ Windows ISO ဖိုင္မ်ားကို DVD ခ်ပ္
ကူးယူဖို ့ေကာင္ေလးပါ)

Autorun Disabling Utility for Windows 7 Download

Autorun enables automatic drive detection and than gives you the exact options you can do with that drive, its really good because you automatically gives the best option from your external drive and hence its really easy to use, but there is a downside of Autorun process it automatically injects viruses and malwares because drive automatically runs with this option.
So if you wanna disable on all drives and other things than you might have to find options in the control panel which may take your time but we have a simple tool to do this work that's Autorun Disabler for Windows 7.
Autorun Disabling Utility for Windows 7 Download
So after you download this amazing small utility from below you simply have to run it and it will ask for the administrator privileges just click on Yes and than you can choose any option to disable Autorun on the drives, well you can even disable on all drives by clicking on the last option i.e : Disable Autorun on all drives, so download this tool from below and have fun.

DOWNLOAD HERE

Get Windows 8 Visual Elements on Windows 7 with Windows 8 UX Pack

windows 8 ux pack
Windows 8 UX Pack gives you the entire Windows 8 UI interface with no changes to your system settings. You are even offered with Windows 8 themes and application to make your system look more like Windows 8. Another good feature about this application is that it changes aero glass effect according to your wallpaper.
In the beginning of the installation you are prompted to choose from three interfaces Metro, M3, and developer preview. Same goes for the themes.
You can even configure your aero settings from the Aura icon in your system tray.
windows 8 ux pack
Note: This application do use a lot of memory at startup, so if your PC starts a little slower than usual don’t worry much about it. Another fact about this application is that it uses more that normal CPU resources.
windows 8 ux pack cpu usage
As you can see in the above image, my CPU usage increased from 1-5% normal to 5-16%. So if you are not a power user, this application will not effect your PC usage in any ways.

Some Key Features of Windows 8 UX Pack:

· M3 user interface for installation/configuration
· One-click installation/configuration
· UxStyle memory patching
· Windows 8 Aero Glass or Lite theme
· Instant M2 and M3 wallpaper/logon screen customization
· UserTile with current user/wallpaper auto configured on login
Download Windows 8 UX Pack

Windows 8 Metro Themes 7 Free


1. Blue Windows 8 Metro Theme [Download]


2. Black Windows 8 Metro Theme [Download]


3. Purple Windows 8 Metro Theme [Download]


4. Windows 8 Dark Metro Theme [Download]


5. Gold Windows 8 Metro Theme [Download]


6. Blue Metro Theme [Download]


7. Darker Blue Windows 8 Metro Theme [Download]


အြန္လိုင္းကေတြ႔လိုျပန္ ရွိတ္ေပးလိုက္တာ ၀င္းဒုိး၈ နဲ႔ပက္သက္ရဘာမွသိပါဘူး အဆင္ေျပက်ပါေစ

Windows 8 Keyboard Shortcuts


Windows 8 Keyboard Shortcuts -
Windows Logo Key + Spacebar – Switch input language and keyboard layout
Windows Logo Key + Y – Temporarily peek at the desktop

Windows Logo Key + O – Locks device orientation
Windows Logo Key + V – Cycles through toasts
Windows Logo Key + Shift + V – Cycles through toasts in reverse order
Windows Logo Key + Enter – Launches Narrator
Windows Logo Key + PgUp – Moves tiles to the left
Windows Logo Key + PgDown – Moves tiles to the right
Windows Logo Key + Shift + . – Moves the split to the left
Windows Logo Key + . – Moves the split to the right
Windows Logo Key + F – Opens File Search App
Windows Logo Key + C – Opens Charms Bar
Windows Logo Key + I – Opens Settings charm
Windows Logo Key + K – Opens Connect charm
Windows Logo Key + H – Opens Share charm
Windows Logo Key + Q – Opens Search pane
Windows Logo Key + W – Opens Settings Search app
Windows Logo Key + Z – Opens App Bar

Thursday, October 20, 2011

Installing ubuntu 8.10 without CD and Internet

က်ေနာ္ Ubuntu 8.10 ကို ဒီမွာ ေဒါင္းလုပ္ လုပ္ဖို႔ ေရးခဲ႔ၿပီးပါၿပီ။ ဒါေပမယ္႔ Install လုပ္ဖို႔ ကိုတိုင္မေရးပဲ ပံုနဲ႔ ျပထားတာေတြကိုပဲ ညႊန္းခဲ႔ပါတယ္။ အခု အင္တာနက္လည္းမရိွ CD drive လည္းမရိွတဲ႔ ကြန္ပ်ဴတာမွာေတာင္ ubuntu ကို အလြယ္တကူ တင္လို႔ရတဲ႔နည္းေလးမွ်ေ၀ခ်င္ပါတယ္။ ကိုကိုရဲ ဆီက သိခဲ႔ရတာပါ။ ၾကာေနပါၿပီ က်ေနာ္ မေရးျဖစ္ခဲ႔ပါဘူး။ ေတာ္ေတာ္ေလး အဆင္ေျပလို႔ windows နဲ႔ Ubuntu ကို dual အေနနဲ႔ သံုးခ်င္ခဲ႔ရင္ အဆင္ေျပဆံုးမို႔လို႔ ေျပာျပခ်င္လို႔ပါ။ Windows ရဲ႕ ဆိုးက်ိဳးေတြ ေတာင္းဆိုမႈေတြ ဘယ္ေလာက္မ်ားမ်ား သူ႔ကို မစြန္႔ႏိုင္ေသးပါဘူး။ use to ျဖစ္ေနတာနဲ႔အမွ် ထြက္လာတဲ႔ software အသစ္ဆန္းေတြကလည္း သူ႔အတြက္ကိုပဲ ဦးတည္ေနခဲ႔တယ္ေလ။ ကလိခ်င္တဲ႔လူေတြအတြက္ကေတာ႔ windows မွာ windows ပဲ ။ ဒါေပမယ္႔ Fedora,Ubuntu စသျဖင္႔ အျခား OS ေတြလည္း စမ္းၾကည္႔ခ်င္ေသးတယ္ေလ။ အဲဒီအတြက္ Wubi ဆိုတဲ႔ Software ရဲ႕ အကူအညီနဲ႔ ubuntu 8.10 ကို သံုးၾကည္႔ၾကရေအာင္ဗ်ာ။
Image Hosting by Picoodle.com
wubi-installer 8.10
အေပၚမွာ Download သြားလုပ္လိုက္ပါ။ 1 MB မျပည္႔ပါဘူး ။ Double click နဲ႔ run လိုက္တာနဲ႔ ေအာက္ပါအတိုင္း ေတြ႔ပါလိမ္႔မယ္။
Image Hosting by Picoodle.com

မိမိ ဘယ္ drive မွာ ထားခ်င္လဲ ဆိုတာကို ေရြးေပးရပါတယ္။ Format ခ်စရာ မလိုတဲ႔အျပင္ မိမိရိွၿပီးသား Data ေတြကိုလည္း ထိခိုက္မွာ မဟုတ္ပါဘူး။ Drive အလြတ္မရိွခဲ႔ရင္ ေနရာလြတ္ အမ်ားဆံုး ရိွတဲ႔ drive ကို ေရြးေပးလိုက္လို႔ရပါတယ္။ အနည္းဆံုး 5 GB ေတာ႔ Free space ရိွရပါမယ္။
မိမိမွာ ေဒါင္းၿပီးသား Ubuntu 8.10 iso ရိွေနတယ္ဆိုရင္ေတာ႔ Internet မရိွပဲ Install လုပ္ႏိုင္ပါတယ္။ ရိွၿပီးသားဆိုရင္ မိမိေရြးေပးလိုက္တဲ႔ drive (partition) မွာ ထည္႔ထားေပးလိုက္ပါ။ က်ေနာ္က drive G မွာ Install လုပ္ဖို႔ ေနရာေပးမွာ ျဖစ္လို႔ Ubuntu 8.10.iso ဖိုင္ ကို Download လုပ္ထားတဲ႔ ေနရာက ကူးလားၿပီး G:\ မွာ Paste လုပ္ထားေပးလိုက္ပါတယ္။
ေဒါင္းမထားရေသးဘူး ဆိုရင္လည္း သူ႔ဘာသာ ေဒါင္းေပးပါလိမ္႔မယ္။ ဒါဆိုရင္ေတာ႔ Internet လိုၿပီေပါ႔။

Password ကို ႏွစ္ခါျပန္ရိုက္ထည္႔ေပးေပါ႔။ user name နဲ႔ password ကို မွတ္ထားဖို႔ အေရးႀကီးပါတယ္။ log in ၀င္တာနဲ႔ user name ေရာ password ေရာ ရိုက္ထည္႔ေပးရမွာပါ။
ၿပီးရင္ Next ႏွိပ္လိုက္။ ေအာက္ပါအတုိင္း သူ႔ဘာသာ လုပ္ေပးေနလိမ္႔မယ္။ တကယ္လို႔ Ubuntu 8.10 ကို Download လုပ္ၿပီး ခုနက ေရြးလိုက္တဲ႔ Drive ထဲကို ထည္႔မေပးရေသးဘူးဆိုရင္ သူ႔ဘာသာ Download လုပ္ေနမွာျဖစ္ပါတယ္။
Image Hosting by Picoodle.com
iso ကို ထည္႔ေပးၿပီးသားဆိုရင္ ၁ မိနစ္အတြင္း Install လုပ္တာ ၿပီးသြားမွာ ျဖစ္ပါတယ္။ Reboot ေပးလိုက္ပါ။
Image Hosting by Picoodle.com
ျပန္တက္လာရင္ Boot Menu ေပၚေနမွာ ျဖစ္ၿပီး မိမိလက္ရိွသံုးေနတဲ႔ Windows ရဲ႕ ေအာက္မွာ Ubuntu လို႔ ေတြ႔ပါလိမ္႔မယ္။ ေရြးေပးလိုက္ရင္ သူ႔ဘာသာ Ubuntu အတြက္ Install ဆက္လုပ္ၿပီး တက္လာမွာျဖစ္ပါတယ္။
မသံုးခ်င္ေတာ႔လို႔ ျပန္ျဖဳတ္မယ္ဆိုရင္လည္း Windows ကိုပဲ သံုးလိုက္ၿပီး Add/Remove Programs ကေန Wubi ကို Uninstall လုပ္ေပးလိုက္ရံုပဲျဖစ္ပါတယ္။
အရမ္းလြယ္သလို သံုးရလည္း အဆင္ေျပပါတယ္။ Windows က လြဲလို႔ တျခား ဘာ OS မွ မသံုးဘူးေသးတဲ႔လူေတြနဲ႔ Windows ေရာ Linux ေရာ Dual သံုးခ်င္သူေတြအတြက္ အေကာင္းဆံုး ပါပဲ။ အဆင္ေျပစြာ ေလ႔လာႏိုင္ၾကပါေစဗ်ာ …

Operating System

မေန ့ညက ပ်င္းပ်င္းရွိတာနဲ ့ … OS (Operating System)ေတြ လုိက္ရွာေနရင္း…ေတြ ့ရွိရသေလာက္ OS ေတြကုိ မွ်ေ၀ေပးလိုက္ပါတယ္။
တကယ္ဆုိရင္ Window Base System ေတြထဲက ရုန္းမထြက္နုိင္ေသးတဲ ့သူေတြ။Microsoft Office ရဲ ့ေအာက္မွာ ေလာင္းရိပ္မိေနသူေတြ အတြတ္ကေတာ ့
ဒါေတြက စိတ္၀င္စားစရာမေကာင္းတဲ့ဟာေတြပါ။တစ္ခ်ိဳ ့က Window XP (or) Window 7 မေကာင္းဘူးေျပာရင္ မခံနုိင္ၾကဘူး။ တစ္ခ်ိဳ ့က Ubuntu ကုိ မေကာင္းဘူးေျပာရင္ မၾကဳိက္ၾကဘူး။ ဘာပဲ ေျပာေျပာပါ။ လူဆုိတာက ကုိယ္နဲ ့အဆင္ေျပတဲ ့ OS ကုိ ေရႊးသုံးတာပါပဲ။ ။
ငဇူးတုိ ့ကေတာ ့ Ubuntu လည္းသုံးတယ္။Window XP…Window 7 ။ Opensuse အကုန္သုံးပါတယ္။ အဲဒါမွ ဘယ္ဟာက ပုိေကာင္းသလဲဆုိတာ သိရမွာပါ။
အခုေတာင္ ကြ်န္ေတာ္မသုံးဖူး။မၾကားဖူး။မေတြ ့ဖူးတဲ ့ OS ေတြ အမ်ားၾကီးရွိေနေသးပါတယ္။အားလုံးလုိက္သုံးနုိင္ဖုိ ့မလြယ္ေပ ့မယ္…လက္လွမ္းမွီသေလာက္ေလး စမ္းသုံးေနတဲ ့သေဘာပါ။
အဲဒီလုိ OS ေတြကုိ စမ္းသုံးရင္းေတြ ့ရတာေလးတစ္ခုက ကြ်န္ေတာ္တုိ ့ဟာ Microsoft က ထုတ္လုပ္တဲ ့ OS ေတြကုိ ပစ္ပယ္လုိ ့မရေသးဘူးဆုိတာပါပဲ။
သူအတြတ္အားလုံးဟာ အဆင္သင့္ရွိျပီးသားေတြပါ။ဘယ္လုိ Software မ်ိဳးျဖစ္ျဖစ္ေပါ့။
Ubuntu ကုိ ကြ်န္ေတာ္ 9.10 က စသုံးဖူးခဲ ့တာပါ။ဆရာသမားတစ္ေယာက္လုိျဖစ္ေနတဲ ့ဦးတြီက သုံးၾကည္ ့ဆုိလုိ ့ပါ။သူက အေခြပဲေပးလုိက္တာ..က်န္တာ ဘာမွျပေပးတာမဟုတ္ဘူး။ ~/Desktop /ls/Sudo ေတြေလာက္ေတာ ့ျပေပးပါတယ္။ဒါေတြက ကြ်န္ေတာ္တုိ ့ Window က cmd မွာ ၀င္ခ်င္ cd/dir ဒါေတြရဲ ့
သေဘာတရားေတြ နဲ ့ထပ္တူညီတယ္လုိ ့ သူက ရွင္းျပပါတယ္။ အဲဒီေလာက္ကုိ ၾကည္ ့ခဲ ့ျမင္ခဲ ့ျပီး အျပန္မွာ ကုိယ္ဘာသာကုိယ္ Try ရတာပါ။
ေတာ္ေသးတာတစ္ခုက အြန္လုိင္းရွိေနတာပါ။က်န္တာေတြက google က ရွာ ဘာညာေပါ့ဂ်ာ။အခုဆုိရင္ Ubuntu 10.04 ကုိ သုံးေနပါတယ္။
ေတာ္ေတာ္ေလးအဆင္ေျပပါတယ္။မေျပတာက သူကုိ စစထြက္ျခင္းမွာ တင္လုိက္တဲ ့အတြတ္ Driver မသိတာပါ။ ATI ကုိေလ။
မွတ္မိေသးတယ္။ ဦးဘန္တူးဖြင့္ထားတုန္း တန္းေပၚလာတာ ညဘက္ ၂ နာရီေလာက္ၾကီး။Driver ထြက္အလာကုိ ေစာင့္ရတဲ ့ဘ၀က ဒီတစ္ခါပဲ ရွိေသးတယ္။ :P
အခုေတာ ့ Window 7 နဲ ့Ubuntu ဘယ္ဟာၾကဳိက္လဲေျပာရင္။ဘယ္လုိ ေျဖရမွန္းမသိေသးပါဘူး။ Window 7 ကုိေတာ ့ စိတ္နည္းနည္းေလးကုန္ေနတယ္လုိ ့ေျပာရမွာပါ။Ubuntu ကုိေတာ ့ …ေတာ္ေတာ္ေလးခုိက္ေနတယ္။ :D အခုအခ်ိန္မွာပါ။တကယ္ဆုိ Ubuntu က ေသေသခ်ာခ်ာ ထဲထဲ၀င္၀င္သုံးလုိ ့ရမယ္လုိ ့ကြ်န္ေတာ္ေတာ ့မထင္ေသးဘူး။သုံးသူေတြလည္း သုံးနုိင္မွာပါ။ ကြ်န္ေတာ္ေတာ ့မရေသးဘာ :P
ေအာက္က list ေလးကေတာ ့ ကြ်န္ေတာ္ ရွာေတြ ့ထားတဲ ့ OS ေတြပါ။

Operating System Resources:

Windows Based

Microsoft Windows – Get support with current versions of Windows and learn about the features of the upcoming version.
Microsoft IIS Server Software – Learn about the featurs of IIS as well as support and tips.

Unix/Linux Based

Unix – Around since at 1969, Unix has since branched into a huge amount of distributions including Sun’s Solaris, Minix, Linux, and BSD.
Linux – Hundreds of operating systems are based upon the Linux operating system.
Ubuntu – The most popular Linux desktop distribution. Simple to use and has a large support network.
Open SUSE – Good for Linux beginners as well as experts. This softward is managed by Novell Inc.
Fedora – A project largely managed by Red Hat Inc. and has some interesting innovations however is sometimes difficult to use for newcomers.
Debian – A large Linux project with hundreds of developers which has gone on to create over 100 Debian-based operating systems.
Mandriva – Formerly Mandrake. While fully functional, Mandriva is often ignored by much of the Linux community.
Slackware – One of the cleanest distributions of Linux out there. The developers accomplish this by simplifying everything down to the core.
Gentoo – Originally designed for power users, many found it to be too tedious to use and update. Known for its extensive online documentation.
Cent OS – Stands for Community ENTerprise Operating System. Designed to be used with servers.
Free BSD – Known for its performance and stability, Free BSD is often used in servers and critical computers.
Web Hosting – Linux is a great Operating System for web hosting.
Apache – The most commonly used web hosting application on Linux based systems. 46% of all websites run on Apache.
သူရဲ ့မူရင္းလင့္က ဒီမွာပါ။
http://www.bighosts.com/top-operating-system-guide.php

Windows 7 beta Build 7000 ( 1 File Download )

Windows 7 ကို ေတာ္ေတာ္စိတ္၀င္စားလာၾကတယ္။ နဂိုကမွ အသစ္အဆန္းသံုးခ်င္ပါတယ္ဆို က်ေနာ္ ဖြၿပီးေရးလုိက္ေတာ႔ ပိုဆိုးကုန္တာေပါ႔။ အရင္တင္ေပးထားတဲ႔ Windows 7 beta Build 7000 က ဖိုင္ေတြ ပိုင္းၿပီး တင္ထားရတာဆိုေတာ႔ အရမ္းမ်ားတယ္ အျခားေနရာက ျပန္မတင္ေပးႏိုင္ဘူးေလ။ အားလံုးလည္း ေဒါင္းလို႔ အဆင္မေျပဆိုေတာ႔ က်ေနာ္႔မွာ အသဲအသန္ ရွာေဖြရပါတယ္။ အားလံုးအဆင္ေျပေအာင္ေပါ႔။ အဲမွာ အဆင္ေျပစရာေတြ႔လာတာက အဲဒီ Build 7000 ကိုပဲ ISO တစ္ဖိုင္ထဲ တင္ထားေပးတယ္။ 32 bit နဲ႔ 64 bit ႏွစ္မ်ိဳးရိွတယ္။ တစ္ခုကို Mirror ႏွစ္မ်ိဳးကေနတင္ေပးတယ္။ Activation လည္း တစ္ခါတည္း ပါၿပီးသား။ ဒီထက္ အဆင္ေျပတာ မရိွေတာ႔ဘူးေလ။ ျမန္ျမန္သာေဒါင္းထားေနာ္ ။ ၾကာသြားလို႔ မရေတာ႔ရင္ က်ေနာ္လည္း ဘာမွ မတတ္ႏိုင္ဘူး။ ဘာအေကာင္႔မွကို မလိုဘူး က်ေနာ္ေအာက္က ေပးထားတဲ႔ လင္႔ေလးကို ႏွိပ္ရံုပဲ မိမိႏွစ္သက္ရာ တစ္ခုသာေရြးေပေတာ႔ …
Image Hosting by Picoodle.com
Windows 7 beta Build 7000 x32 ( 2.43 GB )

Download Mirror 1
(or)
Download Mirror 2
Windows 7 beta Build 7000 x64 ( 3.15 GB )

Download Mirror 1
(or)
Download Mirror 2
Activation …

easy-share.com
Or
letitbit.net
Or
uploading.com
အေပၚမွာ x32 နဲ႔ x64 ကို တစ္ခုေရြးေပါ႔။ bit မ်ားရင္ ဖိုင္ႀကီးမယ္ေလ။ အဲဒီတစ္ခုစီကိုမွ အဆင္ေျပတဲ႔ တစ္ေနရာက ခ်ေပါ႔။ ISO နဲ႔ က်လာမယ္။ CD Burn ဖို႔ ဒီမွာေရးၿပီးသား။ ၀င္းဒိုးတင္လို႔ ကီးေတာင္းရင္ အလြတ္တိုင္းပဲ ထားေပးခဲ႔လိုက္။ အားလံုးတင္ၿပီးမွ Activation ကို ႀကိဳက္တဲ႔ Hosting တစ္ခုကေဒါင္းၿပီး Activate လုပ္ေပေတာ႔။ အဆင္ေျပမွာပါ …

Windows 7 ultimate x86 -en

Windows 7 အဓိက သံုးမ်ိဳးထြက္လာပါတယ္။ ကြာျခားခ်က္ကို ေနာက္မွ ပို႔တစ္ခု ထပ္ေရးပါ႔မယ္။ အခု (ေစ်းႏႈန္းႏွင္႔ လုပ္ေဆာင္မႈ) အျမင္႔ဆံုးျဖစ္တဲ႔ Windows 7 ultimate x86 english version ကို download ေပးပါ႔မယ္။ Serial number နဲ႔ ျဖစ္ပါတယ္။

Download From Mediafire folder (en_windows_7_ultimate_x86)
Download From ifile folder (en_windows_7_ultimate_x86)
Serial number အတြက္က နည္းနည္း shock ရိွတယ္။ သိတယ္ဟုတ္ … ဂူဂဲလ္က ရိုက္ရွာမရေအာင္ jpg အျဖစ္ capture ရိုက္ျပထားတယ္။ ေအာက္ကလင္႔ကို ႏွိပ္ၿပီး ကိုယ္႔ဘာသာ ကူးထားလိုက္ေတာ႔။
ဒီေနရာမွာ ႏွိပ္ၿပီး ၾကည္႔ပါ
(ႏွစ္ခုပါတယ္။ ႀကိဳက္ရာ တစ္ခုသံုးေပါ႔။ Install လုပ္စဥ္ ေတာင္းတဲ႔ အခ်ိန္ ထည္႔ေပးလို႔လည္းရသလို၊ တင္ၿပီးမွာ change Activation key ကို ႏွိပ္ၿပီး ေျပာင္းလို႔လည္းရပါတယ္။)

Monday, October 17, 2011

Installing Windows XP/7 from USB drive


In this post w’ll see the procedure of making a bootable USB drive from an image of Windows XP or Windows 7, and installing it on your system.

What you need for this procedure?
USB drive : 1 or 2 or 4 GB is enough.
Windows XP/7 image:  image is copy of a CD can be made or downloaded, image file has extension “.iso” (there are many image files like .img , .uif , .nrg but iso is standard)
Flashboot : is a software which is used to make bootable usb drive.
Procedure  
1. Download and install flashboot. (demo version but works fine)
  http://www.prime-expert.com/flashboot/download.php
2. Download windows XP/7 image from torrent or any other source,( u can also make a image from the bootable CD using  CDBurnerXP or magic iso or magic disk)
3.  follow the procedure shown in the images:
1) Run FlashBoot, click Next

2) Choose CD -> USB in Main Menu

3) Choose CD/DVD drive or image file and click Next

4) Choose “Convert Windows XP/2000 installation CD” from the scenario list and click Next

5) Choose target USB disk (flash, HDD) or image file and click Next

6) Enter volume label or leave it as is and click Next

7) Check summary information and click Next

8) Wait for process completion

9) USB disk is ready for use. Click OK to exit

4.  Now you have a bootable flash drive. Plug it in the computer on which you want to install Windows & reboot.
5. Go to Boot menu (for intel  motherboards, press F10 number of times when computer is starting specifically on the blue Intel screen) and select your USB device from the menu.
6. Follow the procedure given in the screenshots in the  below link(the webpage in the link is heavy,  have patience  ).
http://www.prime-expert.com/flashboot/xpinst_gallery/
be careful while making partitions.
You can also install any linux distro.(like ubuntu, suse,  redhat etc) using same procedure but the software used will be Unebootin.